I have been looking for innovative ideas in book marketing since I want to directly promote my works at conventions, and all but killed myself lugging a suitcase full of Trade Paperbacks to Orycon last year. One idea was to offer CDs of my works in the PDF format. Since my works are already available in PDF as downloads, I can use the same files and ISBN numbers for minimum effort. The virtue of PDFs is that they can be read in the home computer or loaded into most modern book readers, and can be produced on your home computer - thus being the most effective E-book format.
This concept has a lot going for it aside from the obvious advantages of weight and cost. CDs can be autographed; they can also be touched and drooled over by the readers (especially when backed up by Trade Paperback samples for them to browse through); and most significantly, you don't need the expensive services of a POD printer to set them up.
This report is an outline of my experiment with this media.
If you've reached the stage of marketing your books, you should already have everything you will need:
The CD burners in most computers are light duty machines, but you probably won't be burning more than a dozen CDs at a time. There are production CD burners available for home computer use, but they cost several hundred dollars. These really aren't necessary unless you plan to establish a CD based Small Press. If you are concerned about wearing out your CD burner, stand-alone units can be had cheaply, and plug right into your system.
All the needed materials can be had from any of the major Office Supply houses. The prices below were found at Office Depot in November, 2011:
Calculating all these out, the final price for 100 complete CDs (not including tax, printing ink, and losing a few to setup and production errors) comes to $ 53.93 - .54 cents each. At that price, you can afford to be generous with free samples - another good use for these CDs.
Keep in mind, always, the importance of your label as a selling tool. Good design is especially important in this instance since you have a limited area to work with, and no back cover for followup. Refer to Prepping Cover Art for further details.
One nice thing about this is that you can reuse most of the text and imagery you first created for the book covers. You will probably have to reduce the font size and scale various images or backgrounds, and the CD label will have to be simplified due to its limited space, but for the most part, this is simple cut-and-paste work. You want the CD label to bear a strong family resemblence to the book label for easy recognition.
The best software for label work is Photoshop. The links below are for a CD label template for Photoshop CS4 and later, and for an instruction PDF. Use your right-click and select Download Linked File.
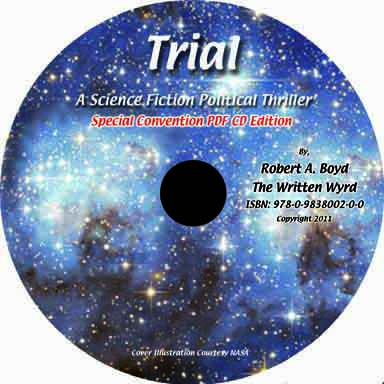 This shows
what the finished label should look like using the templates
above. The template has three LAYERS: Layer 1 is the white outline circle. Layer 2 is the black dot in the center which shows the position of the
center hole, and is used only for graphic set up. Layer 3 is the checkerboard (transparent) background. Everything you add to the template, including images, text, effects, etc., must go between Layer 2 and Layer 3.
This shows
what the finished label should look like using the templates
above. The template has three LAYERS: Layer 1 is the white outline circle. Layer 2 is the black dot in the center which shows the position of the
center hole, and is used only for graphic set up. Layer 3 is the checkerboard (transparent) background. Everything you add to the template, including images, text, effects, etc., must go between Layer 2 and Layer 3.
The best print quality for the average home printer is at around 300 Dots Per Inch (DPI). Anything higher than this will cause a blurry image and lost detail. The template is set at 300 DPI.
If you haven't already done so, use the IMAGE pulldown in Photoshop, go to MODE, and select GMYK color for this project.
Start with the background. If you use an image background as in the sample, you might be able to copy it directly across to Layer 3 (or to a new Layer just above 3) and use the DRAG feature to move it around until you find a spot which gives the best look. The Layer 1 mask (white circle) will cover any excess. When positioning, keep the black center dot in mind so the finished image doesn't vanish into the CD's center hole.
You might have to reduce the background size if you are aiming for a specific image area. To do this, use the IMAGE SIZE pull down to scale the original label image, then copy and paste. DO NOT save the original image afterward! It will revert to its original size when you close the image window.
In doing your layout, you want to leave a fair sized area where you can autograph the CD, as shown at left on the sample. When working with a dark label, be sure to leave a substantial light area for the autograph since decent white pens don't exist. You can see how I retrofitted a light area to the sample using cut-and-paste.
Due to space limitations, you will need to simplify the text on the CD. Specific text items you need include:
Since you are setting things up anyway, you can take this opportunity to create duplicate Special Notices saying 'PDF Edition', 'Audio Book Edition', and 'Media Review Edition'. Make all of these using the same font and format, and position
them all in the same spot right below the title. To select the specific Notice, go into LAYERS and click the EYE symbol off for the extra versions to make them vanish. If you are working with a mottled background, as in the sample, you can highlight text and images by using the LAYER pulldown, go to LAYER STYLE and select OUTER GLOW.
The color of the outer glow can be changed in the settings, and by shifting the 'Opacity', 'Spread', and 'Range' settings to maximum, you will get a solid outline. Finally, when all is said and done, open the LAYERS window and click on the EYE symbol for Layer 2. This will hide that layer, making the black dot vanish. Now that you have the finished label, EXPORT it as a JPEG. Be sure it is still at 300 DPI to insure a correct fit.
The labels come two-up on pre-cut 8.5" x 11" sheets of sticky paper with backing. These have been stamped so that the label will peel away ready to apply.
Start by creating a new Photoshop document 8.5" x 11" at 300 DPI GMYK. Then copy and paste two labels, each on separate Layers so they can be moved around independently. The package of labels includes a printed template. Use this to carefully measure out and position the two images. Once you have them roughly in position, you will need to make a test run to see if you got them located right. If done correctly, the printed bleed area should overlap the stamped label by about 1/16" all around. If it doesn't come out correct, select that Layer and drag it slightly to make the adjustments, then print the label sheet again. (You can use the same sheet multiple times.)
As for the rest of the CD, the document itself can be transferred as is from your downloads files. Since you will have plenty of room to spare, you should look at the opportunity to prepare a catalog file, perhaps a 'Meet The Author' file, and possibly a background info file as PDFs. The more of this sort of thing you include, the better.
When setting up a CD burn on Mac, you need to drag the files to the BURN FILE. This will create ICONS in the Burn File which will pull in the files during the burning process. Once through, be careful not to reuse the Icons, as moving them out of the Burn File to temporary storage, then reloading them will result in copying the icons to the CD. Either leave the file Icons in the Burn File, or discard and drag / drop new Icons for each round of burning. Once you have the files selected, hit BURN, follow the instructions in the pop-up windows, and let Nature take its course.
While I haven't tried this on a PC, I understand the process is pretty much the same as above.
When printing the labels, you must feed them into your printer in one consistent direction (top first) since the stamped sheets are asymetrical. I also found that for the standard home ink jet printer, it is best to feed them through one at a time, as stacking them in the feed tray can cause alignment problems. Occasionally, one sheet will be slightly off, so you should examine each sheet as it is printed to be sure the inked bleed still overlaps the cut label.
Once you have the burned CD, lay it on a flat surface with plenty of light to see by. The labels come with two breakaway tabs to help positioning them. Pull on one of these tabs to peel the label off the backing sheet, and carefully position it over the CD aligned to the center hole. BE SURE THE LABEL IS GOING ON THE BACK SIDE OF THE CD! They don't come off very well once applied. Gently rub the label in a circular motion from the center outward to insure that it is evenly applied. The two tabs will come off easily after the application.
The finished product is attractive, easy to produce, very economical (significant when taking a speculative flyer on a new book), and easy to carry. Unlike bound editions, sales trends can be monitored and inventory adjusted quickly right at home.
The CD idea was well received at Orycon, with both writers and the general public applauding it as an innovative idea. I offered them at a list price of $6.00, and met very little sales resistance when compared to the typically $16.00 of a Trade Paperback.
One curious spin-off was that several people mistook them for Audio Books, and expressed a strong wish for those as well. Something to ponder in another article.
All things considered, convention CDs are proving to be a useful marketing venue in the same sense as downloads and Audio Books.
Related Topics:
Prepping For Print
Index - Small Press Services - Author Services - Artist Services - Site Map
About Writing - Our Reviews - Shopping Cart
Short Stories - Required Reading - Links - Contact Us - Guest Book
Cover Art
Basics Of E-publishing
Prepping To E-publish - Jutoh For Mac
Prepping To E-publish - Legend Maker For Mac
Roll Your Own - CD Books
Spread The Good Word - Audio Books
Fixing Those $%#*! Software Problems